How do you transfer Smartphone video files to a computer?
You may have shot some wonderful footage on your Smartphone but what do you do next? If you decide to edit it the next step is to transfer it to a computer. Unlike the memory cards on DSLR’S, which are straightforward to copy, transferring Smartphone video files to a computer can be a frustrating process. The footage itself is usually buried in some obscure subdirectory and can be difficult to find. Or you need some particular software to get the Smartphone to connect to the computer.
There are many ways to transfer footage off your Smartphone. You can connect via WiFi, Bluetooth or the Internet and the cloud. My personal preference is to connect by your Smartphone’s USB cable. Video files are often large and it can take time to transfer these files over wireless networks. Also if this network should fail in its connection you will get a corrupted file and will have to start again. A USB connection is fast and usually reliable.

So how do you go about doing this? There are several methods but it does depend on which Smartphone you use. Android Smartphones connect straight away via USB to Windows and you can start copying your footage. But on a Mac you will need to have special software. In other words it depends on the model of Smartphone and the operating system of the computer. Hopefully what follows may be of some help.
Android to Windows
To transfer files with a USB cable to a Windows computer you simply plug the supplied USB cable that came with your Android Smartphone into the USB slot on your Windows PC. Once the Android Smartphone connects select the USB tethering choice on the phone. To do this select: Settings – Tethering & Portable Hotspot
A notice should then appear that will give you quick access to this setting. Now you should be able to enable the USB connection between your Android Smartphone and the Windows computer.
Next, on your Windows computer, go to Explorer and search for your Android Smartphone which should be labelled by its model or name. Once found you will be able to explore the file directory of your Android Smartphone. Depending on what camera app you are using there will be a folder that contains your footage. This can sometimes be difficult to find but trust me it is there. Once found select the video files you want and right click and select copy. Now go to a folder on your Windows PC and right click again and select paste. The videos will now copy to your Windows Computer. You can now import the footage into your favourite editor.
Android to Mac
If you plug your Android Smartphone into a Mac via USB nothing will happen. To get access to the folders of your Smartphone you will need to install a free software program called Android File Transfer. This is a free app from the developers of Android.
Once you have installed the software on your Mac, the folders that hold your footage on your Android Smartphone will become available. As with connecting to a Windows computer you must make sure that to turn Tethering on. In Settings on your Android Smartphone enable USB sharing when you connect it to the Mac.
There are not many choices in the software. You can only copy and delete files. I don’t recommend you delete any files only copy them. If you do need to delete files do it from the Android Smartphone not the Mac.
Once you connect between your Mac and Android Smartphone a window should pop open showing the folders of the Android OS. Search through the directories until you find the right folder that contains footage from your camera app. It does depend on which camera app you are using where you find this footage. Once you have found the footage you can then copy it from the Android Smartphone on to your Mac. You can then import it into your favourite editor.
https://www.android.com/filetransfer/
iPhone to Mac
There are several ways to transfer footage from an iphone to a Mac. So you have a few choices. Once you have connected your iPhone to the Mac you can use iPhoto, iTunes or Image Capture. My personal preference is to use iPhoto for footage shot with the built-in camera app. If you need to transfer footage from Filmic Pro or another camera app you may need to use iTunes and access the camera app direct from there.
iPhoto
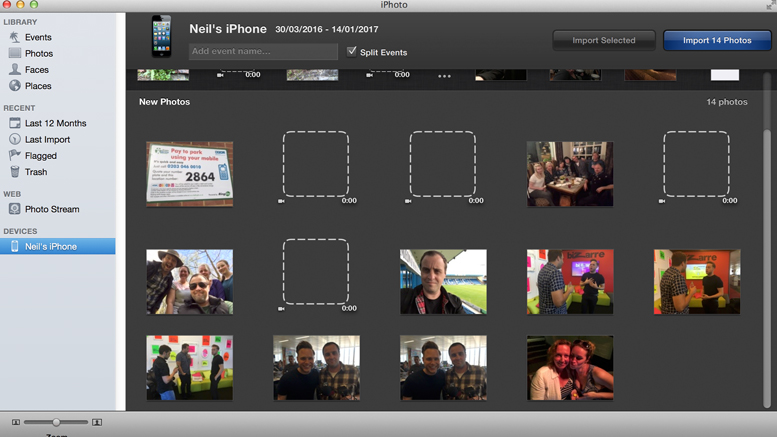
To transfer footage connect your iPhone to the Mac with the supplied USB cable and turn it on. If there is a pass-code enter it into the iPhone to unlock it. When you plug your iPhone in iPhoto should load automatically. When iPhoto has loaded select the iPhone from the list of devices on the left.
Select the footage you want to transfer and select import selected. It will now copy the files to the iPhoto library. Once this is done select the media, right click and copy it to a folder of your choice for editing.
iTunes

To transfer footage connect your iPhone to the Mac with the supplied USB cable and turn it on. If there is a pass-code enter it into the iPhone to unlock it. Load iTunes from the Apps folder. If you have a new iPhone you may have to update iTunes. When iTunes has loaded you need to sync your iPhone to iTunes by pressing the Sync button. When synced select Apps from the menu on the left under your connected iPhone.
Scroll down until you see the list of Apps and select your camera app (e.g. Filmic Pro). A list should then appear of the media files recorded by the camera app. Select your footage and then right click and select copy. Now select a new folder on your Mac where you want to save your media. Right click and select Paste. You media will now copy to that folder.
iPhone to Windows

For best results to transfer video files from an iPhone to Windows you should use itunes. To transfer footage connect your iphone to the PC with the supplied USB cable and turn it on. If there is a pass-code enter it into the iPhone to unlock it. If it asks if you should trust this computer say YES.
Load itunes from the Programs Start menu. If you have a new iPhone you may have to update itunes. When itunes has loaded you need to sync your iphone to itunes by pressing the Sync button. When synced select Apps from the menu on the left under your connected iphone.
Scroll down until you see the list of Apps and select your camera app (e.g. Filmic Pro). A list should then appear of the media files recorded by the camera app. Select your footage and then right click and select copy. Now select a new folder on your PC where you want to save your media. Right click and select Paste. You media will now copy to that folder.
Windows Phone to Mac
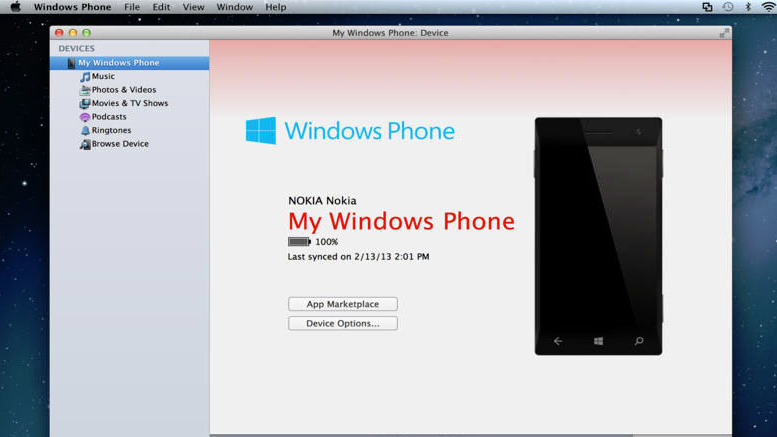
To transfer footage from your windows phone to Mac you will need to download a free software program called WINDOWS PHONE APP FOR MAC. You will also need to make sure you have the latest version of itunes installed.
Once you have installed Windows Phone App for Mac run it from the Apps folder. After it has loaded you can now connect your Windows Phone with the supplied USB cable. You should then see a progress bar and after a few seconds your Windows Phone should connect to your Mac.
The menu running down the left-hand side of the app is where you’ll find the option to off-load your media files. Look for the option that reads Browse Device.
Select that and the main screen of the app will populate with a list of items that are on your Windows Phone. Scroll down to the Video section and select the content you want to save to your Mac. Use of the CMD key on your Mac will allow you to select several items crossing different directories.
Select what you want to download and drag the items to a folder on your Mac. This will copy the files direct from your Windows Phone to that folder and you can now edit them with your favourite editing software.
Windows Phone to Windows PC
If you are using Windows 7 or XP the easiest way to do this is to use File Explorer from the taskbar. If you’re using Windows 8, go to Desktop view and then open File Explorer from the taskbar. Under Computer (called This PC in some versions of Windows), click your phone’s name and then click Phone.
To move files between your phone and your PC, right-click the file you want to copy and click Copy. Right-click in the folder you want to move the file to and click Paste.
If you connect your phone to a PC running Windows XP, your PC may mistakenly ask you to install software that isn’t available. If you get this wizard, click Cancel. You don’t need to install the software. You’ll then be able to use Windows Explorer to move files between your phone and your computer. To use Windows Explorer in Windows XP, your PC must have Windows XP Service Pack 2 installed.
Windows Phone App for Desktop
If you are using Windows 8 you have another option for moving videos. The Windows Phone app for Desktop has a modern interface that displays video thumbnails and makes it easy to add files to locations on your PC.
The Windows Phone app for desktop lets you sync your videos between your Smartphone and your Windows 8 or Windows 7 PC. You can choose to sync with your Windows Libraries or with itunes. If you don’t have the app yet, you can get it at the Windows Phone app for desktop download page.
To sync videos you’ve taken go to the Windows Phone app for desktop, in the top-right corner, click PC, then click Photos. Make sure the Sync photos checkbox is ticked.
Then select Include Your Videos. To sync some of your videos, select any folders you want to sync. To sync all your videos, tick the Sync all videos checkbox. Then click Sync.
Other Popular posts like this:
What is the best free desktop video editing software?
What is the best free video special effects software?